Master the Art: How to Cook Koshihikari Rice in a Rice Cooker
Written By James Morgan
Koshihikari rice is a prized variety in Japanese cuisine, known for its exceptional texture and flavor. But many may wonder **how to cook koshihikari rice in a rice cooker** to bring out its best qualities. This guide will walk you through the steps to prepare this venerable grain perfectly, ensuring every bite is a delight. Whether you're an experienced chef or a kitchen novice, you'll find this guide comprehensive and easy to follow.

Introduction to Koshihikari Rice
Koshihikari rice is a highly regarded short-grain rice that hails from Japan. It was first developed in 1956 and has since become a staple in Japanese households and restaurants. The grain is not only admired for its slightly sweet taste but also for its sticky, chewy texture. This quality makes it ideal for sushi, onigiri (rice balls), and other traditional Japanese dishes.
One of the challenges cooks face when preparing Koshihikari rice is getting the water-to-rice ratio just right. Too much water and the rice can become mushy; too little water and it can be hard and undercooked. Thankfully, with a rice cooker, you can achieve consistent and perfect results every time. Let's delve into **how to cook Koshihikari rice in a rice cooker** to enjoy a restaurant-quality meal at home.

Essential Ingredients and Tools
Before you start cooking, gather all the necessary ingredients and tools. Having everything on hand will make the process smoother and more enjoyable. Below is a list of what you'll need:
| Ingredients | Tools |
|---|---|
| 2 cups of Koshihikari Rice | Rice Cooker |
| 2 1/4 cups of water | Knife Set |
| A pinch of salt (optional) | Cutting Board |
Preparing the Rice
Step 1: Measuring the Rice
Start by measuring the Koshihikari rice. Usually, a standard rice cup (180ml) provides a good measure. For this guide, we are using 2 cups of Koshihikari rice. It's important to measure the rice accurately to ensure the water ratio is correct.
Step 2: Rinsing the Rice
Rinsing rice is a crucial step that removes excess starch, preventing the rice from becoming too sticky. Place the measured rice in a bowl and add cold water. Swirl the rice around with your hand, then pour out the cloudy water. Repeat this process several times until the water runs clear. This may take 3-5 rinses.
Step 3: Soaking the Rice
Soaking the rice helps to hydrate the grains, ensuring even cooking. After rinsing, let the rice soak in clean, cold water for about 30 minutes. This is especially important for Koshihikari rice, as it enhances its natural sweetness and texture.
Step 4: Draining the Rice
After soaking, drain the rice using a fine-mesh sieve or strainer. Ensure that all water is removed. This will prepare the rice for the next stage of cooking and ensure the correct water-to-rice ratio is maintained.
Cooking the Rice
Step 5: Adding the Rice and Water to the Cooker
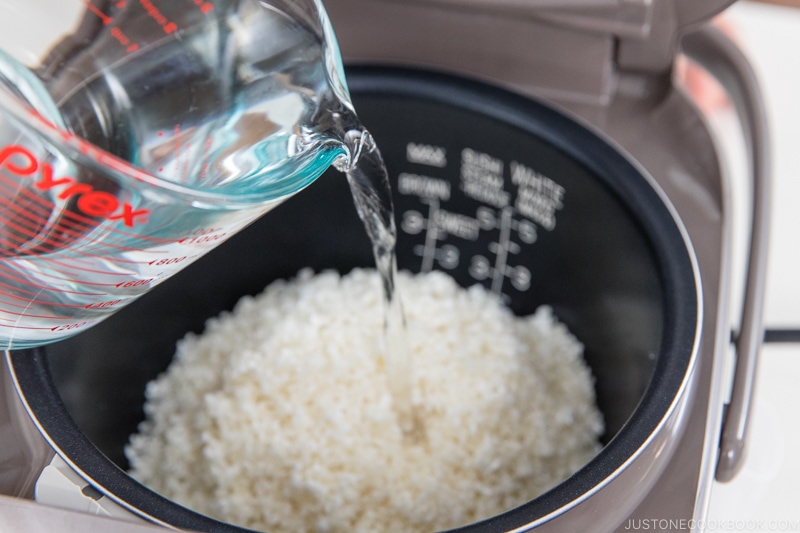
How to cook Koshihikari rice in a rice cooker involves careful measurement. Transfer the drained rice to your rice cooker and add 2 1/4 cups of water. The ratio here is crucial: too much water will make the rice mushy, while too little will leave it undercooked. If you prefer slightly firmer rice, you can reduce the water by a tablespoon or two.
Step 6: Cooking the Rice
Close the lid of the rice cooker and select the appropriate setting. Many modern rice cookers have a specific setting for white rice, which is perfect for Koshihikari. Press start and let the rice cooker do its magic. Cooking typically takes around 30-40 minutes, but this can vary based on your specific model.
Step 7: Letting the Rice Rest
Once the rice cooker signals that the cooking is complete, let the rice rest with the lid closed for an additional 10-15 minutes. This allows the steam to finish cooking the rice, making it fluffier and more uniformly textured.
Serving and Storing Koshihikari Rice
Step 8: Fluffing the Rice
Open the rice cooker and gently fluff the rice with a rice paddle or a spoon. It helps to gently slice through the rice, turning it over softly to separate the grains without squashing them. This ensures the rice is airy and light, perfect for serving.
Step 9: Serving the Rice
Koshihikari rice pairs beautifully with a variety of dishes. It's an excellent base for sushi, a side for grilled meats, or a complement to vegetables. Its slightly sweet flavor and sticky texture make it versatile and delicious. Serve it warm for the best experience.
Step 10: Storing Leftover Rice
If you have any leftovers, store them in an airtight container. Koshihikari rice keeps well in the refrigerator for up to 3 days. To reheat, sprinkle a little water over the rice and microwave it covered, or steam it until warm. The rice can maintain its delightful texture and flavor with proper storage techniques.
Tips for Perfect Koshihikari Rice
Even though cooking Koshihikari rice seems straightforward, mastering it can take some practice. Here are some tips to help you on your way:
Tip 1: Adjusting Water Levels
Based on your preference, you may need to adjust the water slightly. If you like firmer rice, use a little less water. For softer rice, add a bit more. It can be a delicate balance, so keep notes to refine your perfect bowl of rice.
Tip 2: Experiment with Seasoning
While Koshihikari rice is often enjoyed plain, feel free to season it with a bit of salt or a splash of rice vinegar for sushi rice. Add a piece of kombu (kelp) during cooking to impart a subtle, savory flavor.
Tip 3: Utilize the Rice Cooker Features
Many modern rice cookers come with advanced features like delayed start, keep-warm settings, and specific modes for different types of rice. Experiment with these settings to see which ones work best for Koshihikari rice.
Conclusion
Mastering how to cook Koshihikari rice in a rice cooker opens doors to an array of delectable dishes and enhances your appreciation of Japanese cuisine. By following these detailed steps, you'll achieve perfect, restaurant-quality rice every time, whether you're preparing sushi, onigiri, or simply enjoying it as a standalone dish. Investing in the right tools, like a reliable rice cooker, will elevate your cooking experience and provide consistent results. So, roll up your sleeves, gather your ingredients, and get ready to enjoy the ultimate bowl of Koshihikari rice!
As an Amazon Associate, I earn from qualifying purchases.
Recommended Cookware and Maintenance
While cooking Koshihikari rice is a delight, maintaining your cookware ensures longevity and continual delicious results. Consider these products for the best performance:
Maintain your cookware with quality cookware cleaner to ensure your rice cooker, knives, and cutting boards stay in top-notch condition.
Apply cutting board oil to keep wooden cutting boards looking fresh and free from cracks.
For a complementary dish, try this garlic rice recipe for a rich and flavorful addition to your meal.


